The Supply Store
Back to YouCanDraw .Com
|
Case
Study # 2: |
Case study #2: Hugh Hefner, Part I
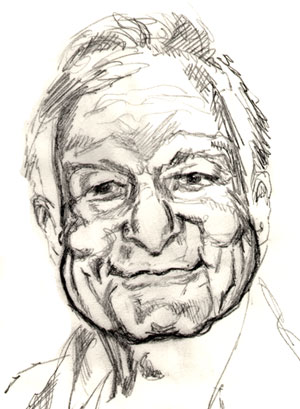
Hugh Hefner - a rough realistic drawing -
(Click on any feature to go to that
section of the book)
|
Links within Mr. Hefner's in-depth study: |
Internet Links
You'll find links to
Internet photos on each page as well so you can look at different views of
our subject or a person being referred to . These are explained more below. (These links can change -
such is the nature of the 'Net.) I recommend doing all the assignments -
and try doing your own drawing of any picture you're having a hard time
understanding. Keep up the great work!
Case Study number one of Keith Richards got pretty long. And we got into some pretty advanced stuff there - it's a good primer as long as it didn't overwhelm you. It was written with this intention: that you could go back and read and re-read it three, four, five times or more for future reference.
In case study two, Hugh Hefner, I'll try to focus on more and more of the general steps - gleaned to a manageable depth - the exact same steps I go through when I'm evaluating a drawing I'm about to caricature and run through about a million times unconsciously while I'm drawing it..
EZ Reference Links
As you saw in the first case study, all
the features of the illustration at the page top are linked to their respective sections of the sourcebook - e.g.
click on Mr. Hefner's eyes, you'll be transported to the eye section; click the
lips or mouth and voila! off to the section on mouth, lips and teeth,
etc. That way
if you have a question about those parts of the features you can find
them in a jiff. (That's American slang for "very quickly".) If
there's a reference to some of the foundation skills you should find a
link to it close by too. So check it out at the top there. Otherwise, off we go.
| Here's the game plan: |
We're going to follow the same basic plan you saw in the Keith Richards in-depth study #1. We started by trying to meet the subject - getting a perception of who he/she is without judging, just listening for our gut response by looking at clues in the face and body language for what kind of person we're meeting;.
-
Then we'll look at the horizontal guidelines, (the middle of the eye line, the base or bottom of the nose line, the middle of the mouth line), on a rough sketch and compare them to the Mr. Average Grid;
-
Next we'll look at a few of the vertical landmarks/guidelines and compare these with those of Mr. Average. You saw earlier for example that the lateral border of the mouth lines up within the Mr. Average alignment guides - the center of the pupils;
-
Then we'll look at individual features - the nose the eyes the ears, the mouth, the lips, etc. - we'll look at their shapes, how they compare to the "average", and at what makes them unique;
-
We'll take a quick snapshot of the hair;
-
Lastly we'll look at how the shapes of the head - the blockhead shapes - gave the face and head volume. We'll also explore their shape compared to Mr. Average. Then we'll push and pull our sketch until the different volumes come to a comical resolution in a whole new caricature - even a cartoon;
-
Subconsciously, if you read your way carefully through the explanations and all the steps, you'll be acquiring a data pool that will contribute to the fifth skill of drawing: the "Gestalt" step where you look at a picture and size it up without even thinking. This will happen automatically in time.
Revisiting Mr. Average
We're going to apply Mr. Average face right away. You Remember Mr.
Average face, right? He's our "idealized" face, the one that's
perfectly proportionate, the one that you need to get ingrained in your
brain so you can start looking at other people and say "well this
person's proportions are different - the eyes are above the half way point,
the bottom of the ears are lower than the 'bottom of the nose' line,
etc.". Here's Mr. Average Face - adjusted for the horizontal
guidelines - for your review:
Mr. Average Face
Let me just point out again that the bottom of the nose line is at the "2/5ths" line. That is it's "two fifth's the distance between the span from the middle of the eye line to the bottom of the chin line. Two fifths the way down from the eyes. In the original Mr. Average face lesson I said the bottom of the nose line was half that distance. That was supposed to make things easier to remember. So adjust this line up a tad towards the eyes. The overall effect: it shrinks the height of the nose and narrows the space - the rectangular area between those two lines. Does that make sense?
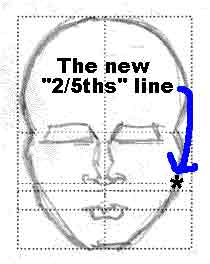
Compare these two lines: the one with the asterisk (the new), and the line just below it - the old bottom of the nose line. Measure their placement in relation to the chin and eye lines. How far is each from from middle of the eye line? Can you visualize the rectangular shapes of each section? Or estimate where the curved lines of Mr. Average's face fall within the rectangles formed by the different horizontal guidelines? Give it a shot.
Try to get Mr. Average Face stuck in your head! For understanding the the face's geometry he's the simplest two dimensional starting point for drawing portraits and caricatures. So just for fun, and for your review, here's a quick schematic of the five major horizontal landmarks / guidelines:
Overlaying Mr. Average on Mr. Hefner:
Overlaying with Mr. Average Face
This picture takes some sorting out but if you look close, you can make sense of it. But not to worry, we'll take it apart with a fine tooth comb and then you can see all the proportions. (Note: Mr. Hefner's outlines have been darkened and Mr. Average has been colored a bright red.) I've emphasized Mr. Average face so you can pick out the horizontal landmarks. Go ahead, take your finger and point out the middle of the eye line, the bottom of the nose line, the middle of the mouth line and the bottom of the chin line. Make sure you've consciously identified them.
In this next picture, the red of Mr. Average has been lightened a few degrees so you can make Hef out a little better (hope "Hef" isn't overly familiar :-):
Softened overlay
Mr. Average and Hef have been aligned by the middle of the eye line. A few reasons for this:
- When caricaturists or portrait artists start to draw, the eyes are
very often the first line put down on the paper - in fact in my
experience, caricaturists start with the eyes - hands down. So it's
almost a convention you could say.
- In life drawing classes, lots of artists may begin with an overall
egg or cube shape for the head then put in other placement landmarks - with some kind of mark
put in for the eyes very early.
- Nothing grabs you when you look at someone the way their eyes do, so
why not start there?
- The eyes are generally closest to the horizontal center of the
head so it just seems to make sense: it starts you in the middle of
your drawing paper and you work out from there.
You could just as easily line up any of the horizontal guideline lines - all configurations will yield some new and novel relationships. You could line up faces at the bottom of the chin line or the bottom of the nose line - all will jog you or mind a little bit differently. Relationships in size, shape, line and contour, symmetry etc, all of these - their relationships - are at the core of drawing. My advice though, line up pictures with the eyes at the center. Doing it the same way each time helps concretize a systematic approach. You can always experiment, but building a method organizes your thinking, streamlines the process.
General Relationships
Overall shape of the head: some general
comparisons
So what did superimposing the two faces do for us? What did it yield? Let's go right down the line, er guidelines (sorry, bad joke). We'll look at the top and bottom halves of the heads first, then get more specific after that.
Starting above the eyes: the top half of the head. Ask yourself: "how well does Mr. Hefner fit within the globe (or half globe) of the top of Mr. Average's head? On inspection you can see the red of Mr. Average more than engulfs the entirety of Hef. Remember though - and this is a detail - the hair obscures the actual margin of the widest point of Hef's head. Still, if Hef was bald, the outline of his head would remain well inside Mr. Average.
 |
The pointers demonstrate the border of Hef's head - but don't forget the real border of the head is partially obscured by the hair. Also note the rose outline of Mr. Average face. |
| Note: The differences of proportion between Mr. Average and your subject can be very subtle. With practice you'll burn Mr. Average into your brain and you'll be able to instantly size up anyone's face by comparing it to your now burned-into-your-brain Mr. Average in an instant. |
The lower half - from
the eyes on down
Now look at the lower half of the head - the area below the middle of the eye line. Hef more than contains Mr. Average - i.e. Hef has a lot more mass and volume than does Mr. Average - below the cheeks.
|
You can see this in the illustration to the right: the far arrow points out the dark border of Hef's face while the nearer arrow demonstrates the cheek line of Mr. Average - entirely within Hef's outline. You can say the same the whole lower jaw. |
|
Note this: as you follow up the curve of Hef's jaw
and cheek (start at the chin), you'll see at the top of the lower
jaw - as the cheeks become the dominant shape - there's a
switch in whom contains whom.
Hef is now contained within the borders of Mr. Average above the level of the cheeks. Interestingly the height, i.e. the vertical span of the cheekbones in both is very similar. I include in "vertical span" both the round, almost spherical part of the cheeks extending all the way up to the cheekbones where they (the cheekbones), begin to form a frame around the eyes at the middle of the eye line. The cheekbones actually rise to the level of the base of the temple on their way back towards the ear.
Looking closer at cheekbones and edges
|
1. Number one shows you where the Mr. Average outline and Hef criss-cross. As we start at the chin and scan vertically, Hef begins as the outermost line containing Mr. Average while after the pointer finger at "1", where the two criss-cross, Mr. Average becomes the wider of the two. What does that tell you when it's time to exaggerate? Right - you can make Hef proportionately even narrower. And since the trend is going from narrow to wide going from eyes down to chin - the opposite of Mr. Average - there's room to go pretty crazy. 2. Number two shows you where the cheek bone changes over to the temple. Remember physically, in the three dimensional world, this is occurring behind the front plane of the face, almost back to the level of the ear. In a front view depth gets more difficult to ascertain. The number two pointer also signifies the narrowing of the head - any head - before you get to the wider, more spherical upper head - or "cranium". The number two pointer is also exactly at the level of the middle of the eye line. (The middle of the eye line is a little tough to see in this picture - but it does in fact pass directly through the horizontal center of both eyes.) |

Look close - you can see "middle of the
eye line" in red crossing from left to right running straight through the
horizontal center of the eyes.
All this brings up an interesting overall point: the
general shape of Hef's head is opposite of Mr. Average. That is, Hef is bottom
heavy as opposed to the top heaviness of Mr. Average. This is an important
observational point in drawing caricatures since at some point you want
and need to do this:
identify the overall shape of the head,
If the whole of the Mr. Average Face is closer to an upside down pyramid in shape, then Hef is closer to a right side up one, and even closer to the shape of a pear if you look long enough. Splitting the face up into upper and lower halves clouded that fact until you think about it for a second - well it made me forget about it for a second :-) . Look at the outline picture below - it's not entirely accurate but if you use your imagination, you can see the general emerging shape of Mr. Average on the left, Hef on the right:
Mr. Average left and Mr. Hefner on the right
-
Mr. Average is slightly top heavy (i.e. the largest mass is at at the top) and,
-
Hef is bottom heavy in comparison with the largest mass at the bottom - in the area of jaw and cheeks.
-
Flip Mr. Average and we get a general "Hef" head outline.
Now we'll superimpose these two. The Hef outline has been shrunk a little and colored red. This is a rough approximate - ok, it's a little more exaggerated than just a rough approximate - but you can get an idea of how the two criss-cross in the area of the cheek bones and at the top of the jaw. You can see how the red outline (the Hef outline), comes in smaller in the top half of the head - i.e. above the middle of the eye line.
Superimposing outlines
I only did this - flipped Mr. Average - because in this particular instance out subject's facial dimensions just happened to bear a resemblance to a flipped Mr. Average. The only rule to be remembered here: get good at comparing your subject's face with Mr. Average and identify as many relationships as you can. ( Need to take a second look at the anatomy of the face? Click here to see that.)
On to Horizontal Guidelines
Ok. We got a "bead" on the general shape of the head. In terms of horizontal landmarks and guidelines, lets start from the top of the illustration and work our way down going through the major horizontal lines of the front view of the face - one at a time.
To review, there are five we'll concern ourselves with right now:
- the middle of the eye line,
-
the bottom of the nose line,
- the middle of the mouth line,
- the top of the head line, and
- the bottom of the chin line
It seems kind of redundant to mention them, but
if they're not demonstrated or referred to, there's always an implied top of the head and bottom of the chin
lines. But I'm not going to take anything for granted. (Look in some
medical anatomy books if you get a chance - the amount of differentiating between
lines and shapes and "sulcii" and fossas and protuberances and
bony prominences and hills and valleys is amazing.)
Onward - the middle of the eye line
The middle of the eye line - as mentioned above - this is our default line, the line where we start.
| 1.
Points out the middle of the eye line - and it falls
exactly through the center of both eyes
2. Number two points points out the bottom of the chin line Note how nicely this works out for our purposes when you discover what does and doesn't line up so well. |
 |
Lining things up
Here's an interesting coincidental finding though: the bottom of the chin lines
of both subjects line up very nicely, in fact exactly when
the middle of the eye lines of both are aligned! And that's sweet because
it tells us right away we can exaggerate that difference based on how the
two top of the head margins line up. Let me say that another
way - the distance between eyes line and chin in both pictures is
proportionate. So when Mr. Average and the subject (Hef), are made about
the same size, those two lines line up nicely. (Something you can do with the magic
of Photoshop but will eventually do with the magic of your own
"artist's eye".)
However, Mr. Average is clearly dominating the top half - the crown. The top of his head is still a measure taller. And since we're drawing Hef, not Mr. Average, this means when we draw Hef, we draw the top half smaller in proportion than the the lower half of the face. It's a reverse thing, ya see? That make sense?
And as I've mentioned before, psychologically, the part of our brain that recognizes faces doesn't require the forehead to be visualized to recognize the face. Right away, with that bit of info, you could almost draw any face, lop off the forehead and everybody in the world could still recognize the face. Instant caricature.
Next: the bottom of the nose line
It's slightly obscure, but again, the two line up amazingly! Hef's nose is wider and bulkier than Mr. Average's. But that's for the next section on the vertical rules of the face.
 |
Here,
you can see the bottom of the nose line as well as the
middle of the eye line (the pointer fingers are pointing out
both).
Hef is offset to the side a ways so you can see how he rests within the frame work of the Mr. Average face horizontal guideline grid (red). It's a little tough to see, but the bottom margins of both our character's noses line up nicely. ("Margin" is equivalent to " edge". ) |
But what part of the nose lines up?
And of course, if you look really close, you can say the bottom of the nose line lines up in both, but you have to ask the further question of what lines up, i.e. what part of the nose lines up at the bottom of the nose line? In Hef's case, its the little pointy extension of the tip of the nose that touches the line - and not the nostrils nor the main bulk of middle protrusion of his nose.
Look at the rough of Mr. Average and see how the nostrils more or less line up with the lower margin (edge) of the tip of the nose? Hef has a much longer "septal tail" - that fleshy piece of tissue that's between the two nostrils and molds right into the nasal philtrum (the philtrum is that little groove just above your upper lip).
That's an interesting distinction - the low pointy tip of the nose. We're getting pretty sophisticated here, but yes in time you will start making some "micro" distinctions like that all by yourself - this will come with your growing intimacy and expanding knowledge of anatomy and spatial relations. Now make a conscious effort to compare the shape of both noses. Check it in on your "to be exaggerated list".
Next, the middle of the mouth line - read carefully :-)
The nose is 2/5th's the way down the distance between the middle of the eyes and the bottom of the chin. That leaves us with 3/5ths of the same real estate to somehow fit in the mouth, lips and chin. Here's where remembering the old way of thinking about the placement of the bottom of the nose might become useful (remember - when we placed it it half way down? link to Mr. Average). Well sort of. It's useful in this regard: the middle of the mouth line falls on a line that's one third the way down the remaining half of the face. I know, I'm getting all confusing here. Lets do the math.
The frontal view of the face/head is split in half at the eyes. The lower half of the face can be split in half again. In Lesson 14 we placed the bottom of the nose line at this half way point.
Now, if you split the area under the nose (which
is the bottom one fourth of the face), into
thirds again, the bottom line of the first third would mark the level of the middle of the
mouth line. Now that seemed a lot easier that way didn't it? Maybe
not. (See The Lesson, 14
Part II on the front view for review. Look
towards the bottom of this page link). If
this seems overly complicated, take a break, come back and take smaller
chunks and re-read or draw out these comparisons and templates (like the
horizontal landmarks).
Hef's middle of the mouth
horizontal alignment
The pointer at "1" in the illustration just above shows the approximate middle of the mouth line in comparison to Mr. Average's middle of the mouth line (at "2"). In this comparison view, you can see Hef's mouth is landing above Mr. Average's. Aha! Another thing to add to your "to be exaggerated" list: placing the middle of the lip line up tighter against the bottom of the nose line.
The Chin
Since the bottom of the chin line fortunately already lands square on that of Mr. Average, we're spared over-explaining it. It brings up the question of "what goes in this space then - the space between middle of the mouth line and the bottom of the chin line?". In Mr. Hefners's case, he has a lot of chin. Big checkmark - lot's of chin goes right there on the "exaggerate list". For others' (like Charlie Watts) this space is filled by lower lip. In other faces this space is just a wide stretch of "frontal plane" - which basically means white space - you don't have to draw anything - just respect it as a clear stretch of plain old white space.
In review: (illustration of matching up the horizontal landmarks) Let's quickly take stock of our findings thus far:
Looking for the subtle overall differences in horizontal guidelines
Let's summarize space-by-space. Aha - surprised you huh? Well probably not. Before this point, we looked at just where the horizontal guidelines fell - we were evaluating line-by-line. Just like in Lesson 6 on negative space I want you to concentrate on not the lines for a moment but on the spaces between them. This is good right-brain practice.
This accomplishes two things: it switches your perspective
and forces you to look at the picture in terms of spaces, not lines. Now
ask yourself just how big are those spaces (1 through 4), and ask which
features fit within those spaces. This constant comparing and contrasting
of relationships is at the core of all drawing.
Space-by-space comparisons
Mr. Average and Hugh are roughly the same size in the above illustration so the proportionate differences in these spaces will pretty revealing.
1) Space one - between the top of the head line, and the middle of the eye line. How do they compare? You can see Hef's space is smaller (the lines are converging); this is consistent with what we found above when we overlapped Mr. Average and Hef above. Ok, not a whole lot of new information - but again, it's a slightly different perspective.
2) Space two - the space between the middle of the eye line and the bottom of the nose line (2), it's subtle but it looks like space widens as we go towards Hef - the lines diverge. We saw above these two lines were pretty parallel. Part of the discrepancy is that I didn't quite line up these lines perfectly in Photoshop. Bit it's also true Hef has got that pointy lower part of the nose (the fleshy septum). And heck, his nose looks bigger than Mr. Averages! It's certainly wider - but we'll look more of the width issue below.
3) Space three - it's narrowed - the lines converge towards each other as we move left to right.. If you have a long nose and a big chin and a limited space to fit all this into, something's got to give. This space between the bottom of the nose line and the middle of the mouth line is a narrowed space - we'll need to cram the features closer together there.
4) Space 4 - this space widens. The lines diverge as you go from Mr. Average to Hef.. That's consistent with what we found above.
Super Summary of the horizontal guidelines and what they suggest we do to exaggerate Mr. Hefners's portrait:
-
shrink the forehead;
-
make space 2 a little wider - or even keep the same (so the nose might get bigger);
-
bring the mouth up towards the nose and lastly;
-
make the chin bigger
Does looking at the spaces between horizontal guidelines tell us anything new? Yes and no. It just shows us that even though we found differences, they're subtle. It's also plain why there's more to getting proportion cues than by just contrasting the horizontal guidelines. But it is a start. And you can still work from those subtle differences. They really do get you started. Carve into them, play with them. Experiment. You WILL get the feel for exaggeration if you just keep at it! :-) Just reviewing all the case studies initiates the process - hopefully it fills your head with the visual and verbal vocabulary of drawing and caricature.
Test what you've just learned
Before we go on to vertical guidelines - take a break and "sight" the lines, spaces, and proportions you just heroically worked your way through in this first section of several sections - part one of the Hugh Hefner In Depth Caricature Analysis. (A little commercial there.) Concern yourself ONLY with the horizontal guidelines for this next mini assignment. Your mini assignment: visualize the 5 horizontal guidelines lines we talked about above. Visualize them running through their respective places on this face:

Visualize the horizontal guidelines
Next section: the vertical guidelines. In this section you'll review vertical relationships of the face and features and compare / contrast with Mr. Average. Click the link for
Part II: The Vertical Guidelines
Web picture references
There's still lots of places to turn though. Below you'll find a handful of links that have a good picture so you can
- draw the subject yourself and,
- see if we've captured a likeness. These addresses were valid as of 3/9/2001. But you know how fast the web can change. Enjoy.
|
Directions (if not already highlighted):
|
Kasbohm & Company's
YouCanDraw.com
© Copyright, All rights reserved 1997
e-mail: jeffkaz@YouCanDraw