
"Right Brain" FAQ's
Staying Motivated
E-magazine Archives
Glossary
The Supply Store
Part IVb: drawing the side view |

Assignment 1: Warm-up |
As a warm up: draw this as a pure contour drawing (it's a small page). I want you to look into all the small lines - the sutures of the skull. Recall a pure contour drawing is when you're looking at the screen only - recording every move your eyes make along the image's lines, without looking at your creation (that is, at the paper under your drawing hand). Do this for 5-10 minutes. The reason? To pull you back into r-mode. Then you'll be ready for the next assignment.
(If you need to reference anything, most of the relevant lesson links are at the bottom of this page. If you can't find a lesson you need there, click on the Lessons Library )
Assignment 2: Drawing the format |
Like in Part III, you'll start by drawing the format first. You need a place to draw the head inside of - and the format is the place.
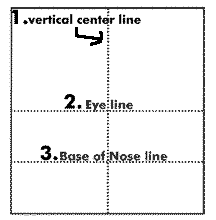
The format, as you recall is the frame around the drawing. In this case it's rectangular. In real world dimensions, the format around the profile of the head, (the side view), is 8 inches tall, and 7.5 inches deep. (7.5 inches wide in the orientation you're seeing here. You say "deep" when you're working in three dimensions.)
So go for it, do a dozen drawings of this scaled-down format:
Draw this format (without
words
of course)
Notes on drawing this format |
Line it with 3 lines:
The vertical center line
the horizontal middle line (the extended eye-line)
And the base of the nose line - which here becomes in essence the lowest margin of the ear line.
(Don't worry about it being as small as the drawing above or a full 8 x 7.5 inches. You could draw a square and you'd be close enough.)
Draw at least a dozen of them. A full twelve - it's a good warm-up.
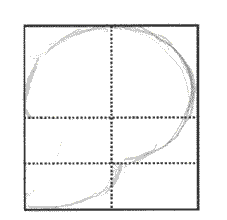
Assignment 3: Fill your formats with side views |
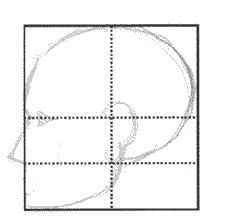
Excellent work! Now You're going to fill all those formats in with profiles of the head, just like this:
Fill your formats with
the side
view
Click here to print out a format that you can fill-in after you've filled in all the formats you've made in the first assignment above.
Like to see the steps along the way? |
Just like in the previous front view lesson, you can see what you're about to draw in the gif animation. There you'll see all the steps drawn in succession right before your eyes. And, to really make this clear, you can see the break down of the major steps - and the r-mode techniques you'll employ - in the section below.
Here's the
breakdown on the side view |
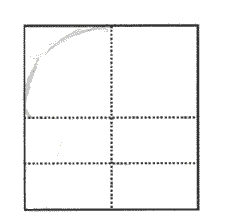
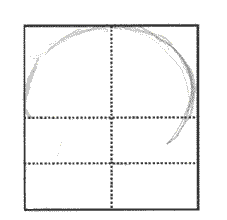
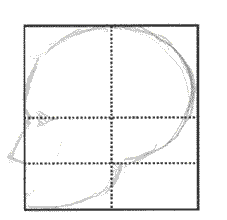
You can start any where you like, but to make it easier I recommend starting at either the top of the picture or at the most logical starting place. I'm going to start at the the left margin of the eyeline since the forehead and skull form a large egg-shaped contour, and it seems like a logical starting point. Like in this illustration :
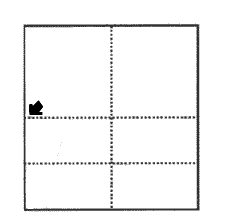
1. Start
at the arrow
And what are you starting? You're starting at the bridge of the nose. It's slightly indented and it's not big so you might have to lean into the screen a bit to see it. Compare the angle this tiny segment forms in comparison with the vertical and horizontal lines around it. Duplicate this on your paper.
2. Bridge of the nose -
look
close!
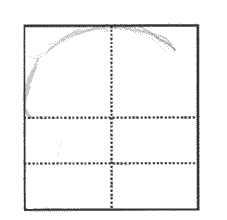
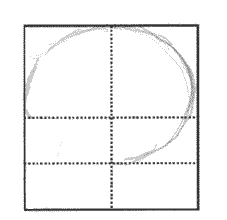
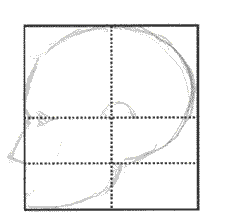
Start working your way up the forehead. Again pay special attention to the angle it forms with the vertical and horizontal lines of the format.
3. Working your way
up the
forehead
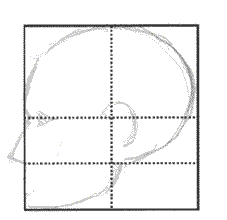
Next, there's a little transition from forehead into the actual crown of the head - anatomically you're making the transition from frontal bone to temporal/parietal bone that encase the brain. On some individuals this is a marked transition, i.e. an obvious change in angle. In others it's hardly perceptible. (We'll be looking just a second longer at the forehead in the next section. )
4. Transition area of forehead
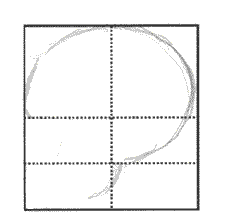
In the next two steps we're finishing off the top half of the head:
 5. almost finished... |
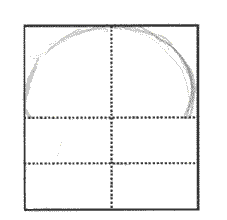 6. ..finished. |
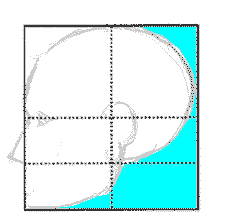
Recall when you're drawing lines, you're drawing edges and contours. Those could be the edges of objects or the spaces around those objects. As further practice try to visualize the space surrounding the contour of the head as it's own "stand-alone" object. Then view the skull as the object or "positive shape" that it is.
(The more practice you get at consciously making this shift, the better and more naturally you'll apply it when you're actually drawing.)
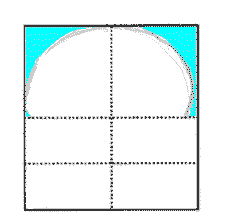 a. Visualizing the "negative space" (the blue shaded area) as the main shape. |
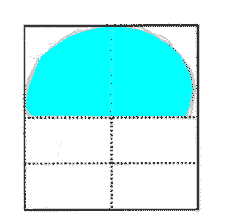 b. Focusing on the object, the actual skull (shaded blue), as the main shape |
Continuing on as
the skull curves |
 7. |
 8. |
7 and 8: The very back of the head curves forward towards the jaw...and towards the ear lobe, towards the juncture of the vertical center line, and lastly, towards the base of the nose line/bottom of the ear line.
Adding the jaw line |
Now, we've begun the curve of the jaw in "9" and extended it all the way to the lower left hand corner in "10". The jaw - back of the head intersection is not exactly at the intersection of the of the base-of-the-nose line (which is now the "bottom-of-the-ear-lobe" line), but it's pretty darn close. The jaw roughly fills the lower left rectangle of the side view:
 9. |
 10. |
9 & 10. Filling in the lower left rectangle with the jaw
Placing the Nose |
Pay special attention to the base of the nose line and the eye line again. Why? Because the nose fits nicely between those two lines. And it notice how it protrudes beyond the main plane of the face.

11. Fitting in the nose
Adding the Eye |
Notice in this next illustration where the eye is placed: it's sitting right on the eye line and just a bit back back from the the little indentation that marks the bridge of the nose (over at the far left there.) When you watch the "gif" animation, look for the "x". It sneaks up on you.
12. The eye is split
by the eye
line
Adding the ear |
Adding the nose: start dead center in the side view - at the intersection of the center vertical line and the horizontal center line. It's hard to see in this illustration, but begin the ear with a little line segment that heads off to the left and up. (like the nautilus shape I mentioned above). Then you can begin curving towards the back of the head.
13. Start the ear at
dead
center
 14. The helix dominates the main curve of the ear. It courses it's way past the center line... |
 15. ...and finishes in the smaller curve of the lobe - right on top of the base of the nose line/bottom of ear lobe line. |
Exercise |
As a further exercise in jumping back and forth into r-mode, try this: visualize the area behind the back of the head and jaw as negative space. That is, you're viewing the area of the picture to the right of the mass of the head as it's own bona fide shape. Don't scroll down to see what I mean - I think you'll have no problem doing this on your own.
16. Negative space practice
Adding the Lips |
Q: So where are the lips? C'mon, you can remember. Let me jog your memory: what line do they fall on and how far down from the nose and up from the chin do we place them?
A: You said a third of the way down the distance between the bottom of the nose and the bottom of the jaw (or chin) right? You are amazing!
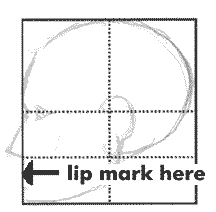 a. Here's where it goes - 1/3 rd the way down the distance between the base of the nose and the bottom of the jaw. |
b. And
here it is - just a thin little line. It's a
place keeper for now.
|

So go to it folks! Fill all the side view formats you've drawn so far, print more if you get sick of making them, and fill in 25 to 30 of them with this side view. Pay attention to the placement of the features on and around the grid lines. Internalize this and you've got another huge notch in your drawing repertoire belt. Watch the gif animation over and over - a hundred times if you need to.
Go slow, take your time,
reference
these lessons if you need to:
1. Pure Contour
2. Modified Pure Contour
3. Upside-Down Drawing
5. Negative Space Drawing
6. Vase/face drawings
Kasbohm & Company's
YouCanDraw.com
© Copyright, All rights reserved 1997
e-mail: jeffkaz@YouCanDraw