
The Supply Store
Back to YouCan Draw.Com
Lesson 3 Exercise: Upside-Down Drawing |
|
Time to do your upside-down drawing assignments...
|
 |
| As is customary, I've put together a little animation to give you an idea of what you're doing here (Click for Animation). Read this entire page first before you do any drawings. Also, since many people have commented they think the cowboy is too complicated to rush into, I've done two things... |
...First, before you even try any part of the cowboy, I think you you should warm up on the four simplified line drawings, a few of the 15 or so of the intermediate upside-down compositions and watch the animation where you'll see the exercise outlined for you in it's entirety. (You'll find the intermediate level upside-down drawings below).
Secondly, I've broken the cowboy up into nine separate smaller pictures in the order you see in the following grid. Each square has a fraction of the total picture. Just click on the blue numbers and you'll get the partial picture. When you've done all 9, trim off any extra paper and piece them back together for the completed cowboy. You might be amazed at what you've done. Section 5, 8, and 7 are the three most difficult sections (in descending order of difficulty).
Each number is a part of the bigger picture
Draw each section on a quarter page of typing paper. (Fold the paper in half twice, cut it along the bends and you'll have the right size paper.)
(The animation is a biggee: 108 kb but you'll see the whole exercise running right before your eyes. I shrank it's 115 frames as far as my computer could before I loaded it here.)
And thirdly, you can come back to this or any section as many times as you want, so don't try and do everything in one session. The brain absorbs things best slowly and with lots of repetition. (back to top)
Step 1
Before you start. Read all the instructions.
Allow yourself at least half an hour. (Forty minutes or even an hour would be better. If all you have is 15 minutes work with that.) Set an alarm clock or timer.
Find a quiet, comfortable place where you won't be disturbed. If you prefer, put on some music. It's been discovered that slow- paced, gentle music like Baroque or Bach, increases right brain activity! Sixty beats a minute seems to be the best time signature since it also slows the heart to a relaxed 60 beats a minute.
Try to finish upside-down drawing #2 in this single session.
Most importantly, don't flip your drawing, your monitor, or the picture over until you're done. Flipping it right side up will flip you back into L-mode, and I want you to spend as much time as possible seeing as an artist sees: experiencing the very pleasant R-mode.
Challenge! For those of you who have extra time I have an experiment for you to try. Try drawing the full cowboy picture right side up first (from the right side up versions). Then come back and draw it as outlined here: upside down. One caveat if you do do this: You've got to promise me you won't criticize yourself if it doesn't turn out as good as you think it should. (Here's the right side up version.) You can do this with any of the drawings here by printing them out first, then drawing them in their normal orientation. I guarantee you the results of your upside down drawing will truly impress you! In fact, if you choose to take this challenge, I'll post your results - your actual right side up attempt and the Upside Down drawings. (Just like those before and after pictures!) I'm looking forward to seeing your work. Send them to me, or a copy, on 8 and 1/2" x 11" paper at: YouCanDraw.com, c/o Kasbohm & Company, 1351 Hampshire Ave. S., #127, St Louis Park, MN, 55426. If you want them back, include a short note that says so and please include an addressed stamped envelope. (back to top) |
Step 2
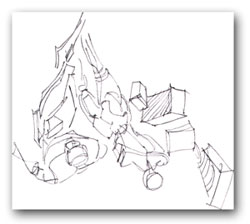
Take a minute to look at the illustration (this is upside down #2). With your eye, pick a line, any line and follow it to where it intersects another line, or disappears. Follow it from it's beginning to it's end. Notice areas that curve. Note how lines - when lines intersect - they do so at an angle. Compare those angles to the edges of the drawing.
Ask yourself:
Do these lines angle towards or away from the horizontal of the top of the drawing?
Towards or away from the vertical sides of the frame around the drawing?
How long is this line in the top and middle of the drawing compared to the the very next line over? (Pick any line to do this with.)
Pick one line at a time and follow it
Doesn't it seem that the lines just kinda' all fit together? Keep exploring around the picture for a few more seconds. Look at the curved lines, see how they're in "curved spaces" or objects. The lines form spaces: can you see the forms they make?
Step 3
Start at the top of the drawing like you see in the figure. Copy it just like you see it: the picture is upside down and you'll be drawing it upside down, so you'll be starting at the top of the drawing as it sits on your computer screen. (It's marked as such when you get there.)
Start with any line that's close to the top border and copy it. Remember to compare the angle of the line - or segment of line - in relation to the top or side of the drawing. Then move to the very next line - that is, to the line immediately adjacent to the one you just drew.
Don't get caught up naming anything: just keep asking questions like "how does it compare in size, length, or angle?" Observe what you see: "this curve is angling towards the bottom, and meets with this next line at a right angle" etc. Observe it, then copy it.
If you come across something you recognize, avoid pinning a name to it. If something looks like h-a-n-d-s, or e-a-r-s, just keep doing like you were instructed above, observe what you see: "Well these lines kinda criss-cross, and these well, this one hits the right border at a 45 degree angle".
Keep plugging away line by line. And I'll remind you again: avoid naming or attempting to name anything that looks familiar other than by describing where it's coming from, and where it's going to.
Step 4
Begin your drawing now. Copy one line at a time. Start at the top. Move to each adjacent line. Go piece by piece, line by line. The picture is complex by design. Don't worry about "getting it right" - just draw what you see. (Go to )
Step 5
Once you you get into the drawing, notice how interesting it's becoming. You may notice an occasional moment of frustration at the beginning - that's the L-mode trying to assert itself at a task it just wasn't made for.
As the complexity of the picture becomes apparent, L-mode will give up, R-mode will turn-on and you'll notice, almost in retrospect, you've slipped into a state of deep involvement with the picture. You may notice the music you had on has faded, that your 30 or 60 minutes has flown by, and you've used no words the entire time. (That's been a welcome break!)
If you feel the need to think about something other than the drawing at hand, let that pass. If you feel the need to reference something else, like a memory of how this ought to look (even though you barely recognize what you're drawing) remember this: all you have to know is in front of you. It's all laid out. Every line, every angle, every curve, every space is right there in front of you on the page. (Or on the screen.) All you need to do is copy it. It's that simple!
Here's you drawing assignments:
We've used upside-down drawing #2 for demonstration, but I recommend starting with it. Then do the rest as homework in different sessions - or all at once if you've got time. You learn things best if you don't try to do too much too fast - don't overburden yourself by trying to keep up an impossible pace. Learn at your leisure, review what you've done. Come back when you feel excited about it, (usually in a day, 2 days at the most.)
If you
like, watch the animation again: Click
for Animation
Then get
to work. You can do it. You can draw!
The beginning drawings:
(back
to top)
The intermediate drawings:
(back
to top)
Here's the intermediate drawings - don't print them out (at least not until you've tried drawing them). Draw them directly off the screen as you see them. When you turn them right side up, you're in for a pleasant surprise. (Hint: draw a square on your paper that's roughly similar in size and shape as the border you see around each picture.)
Don't be intimidated by any of these - take each one line by line, just like you saw in the animation above. Start at the top and work your way to the bottom. If you feel your self "trying to recognize something", let the feeling go. Just keep heading down the page little line section by little line section, aligning, comparing and contrasting the section of line you just drew to the one just before it. Take note of how the line approaches (or even touches) the vertical or horizontal frame around it. Go for it:
The broken up cowboy pictures:
(back
to top)
Here's the big cowboy picture in 9 separate pieces:
Big Tex
And last, but not least, this is the big, the huge, the complex geetar-playin' cowboy picture you've all been waiting for. If you've done the nine smaller pictures, this one will be a breeze and great practice for getting into R-mode:
Go here read this when you're finished.
Kasbohm & Company's
YouCanDraw.com
© Copyright, All rights reserved 1997
e-mail: jeffkaz@YouCanDraw