
Back to
The Supply Store
Back to YouCanDraw .Com
Get a pencil. Find a chair or a piece of furniture. The goal: to practice getting a feel for sighting. That is, you'll actually perform a visual measurement - visually "sighting" horizontal and vertical lines in the world (on a chair in in this example) and then comparing, gauging, and relating them to the edges of your paper or a drawn format on the paper. In Part VI , animation one demonstrates this whole lesson.
Materials: a fairly new, (long) pencil, a paper, one chair (or go to the chair illustration - it's in step 3 below.) Read through the exercise first.
Time required: about 10 minutes for a "dry run" - if you do this without doing the drawing part. Give yourself 30 minutes otherwise.
Step 1: Vertical Angles
Take hold of your pencil. Hold it straight up and down - that is, vertically - with the eraser up. (Just like in the illustration.)
 |
Look at
the chair or any object in the room. Preferably one with
lots of straight edges. (chair, fax machine, a coke
machine, a table, a bookshelf, the television, make sure
its off). Step
3 below
has an illustration.
Step 2 |
Now, with pencil vertical in hand, extend that arm in front of you. (Elbow straight.) Close one eye. (If you're holding out your right arm, close your left eye; if you're holding out your left arm, close your right eye.
Step 3
Aim down your extended arm without tilting your head to either side. Pick an edge or corner of the object: any edge or corner. Compare it to your vertical pencil. It will form an angle or it will be parallel to the pencil. Close your eyes and imagine that angle. Imagine how you'd draw it on the paper. Open your eyes.
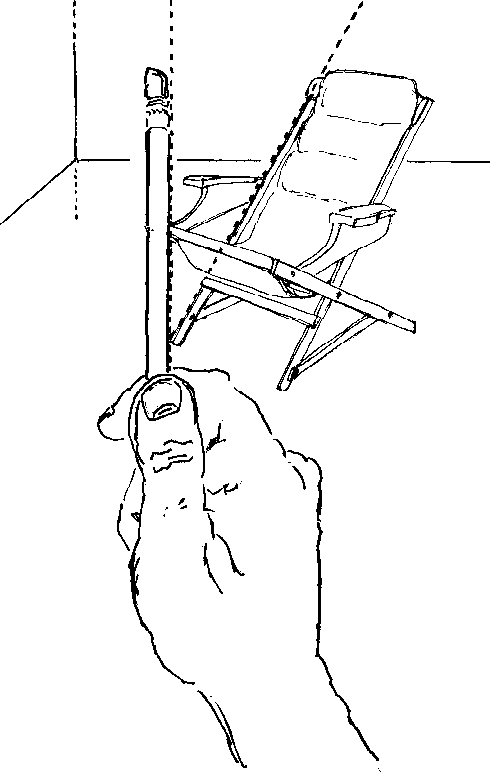
Compare
the angle
between your vertically
held pencil, the
vertical axis of the corner (dotted
line) and the long wood
strut of the beach chair
Step 4
Now draw a line on the paper that matches the angle between the vertical pencil and the edge of the object. Use the edge of the paper as the counterpart to the vertical reference of the pencil. If the edge you've chosen is vertical, then draw a line that's vertical, i.e. parallel to one of the sides of the paper.
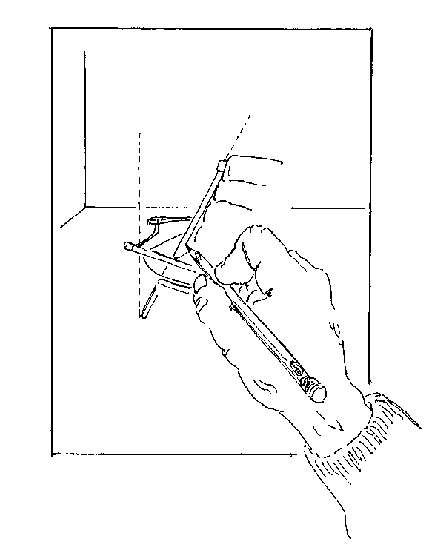
Drawing the angle you've "sighted" in step 3 on your paper.
Step 5: Horizontal Angles
Hold your pencil horizontally. You want it parallel to the floor. (Sometimes if you hold an end of the pencil in each hand - eraser end in one hand, pointy end in the other - it's easier to hold a steady "horizontal". Remember to hold your arms straight out in front of you with elbows fully extended.)
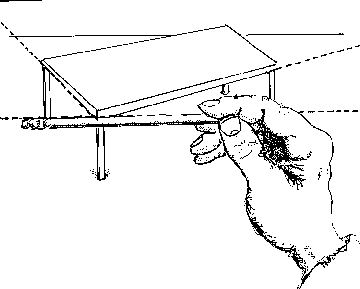
Compare
the angle of the dotted lines on the table to the dotted
line
of the horizontal pencil. (This flat table might be
easier to sight
compared to the more complicated beach chair above.)
step 6
Choose another edge on your object. Compare it to the horizontal of the pencil. Depending on the angle you're viewing the object from, the edge you've chosen might be parallel to your pencil or it might diverge at an angle. Observe that relation: parallel or angled. Close your eyes and picture how that angle can be drawn on the paper. Open your eyes.
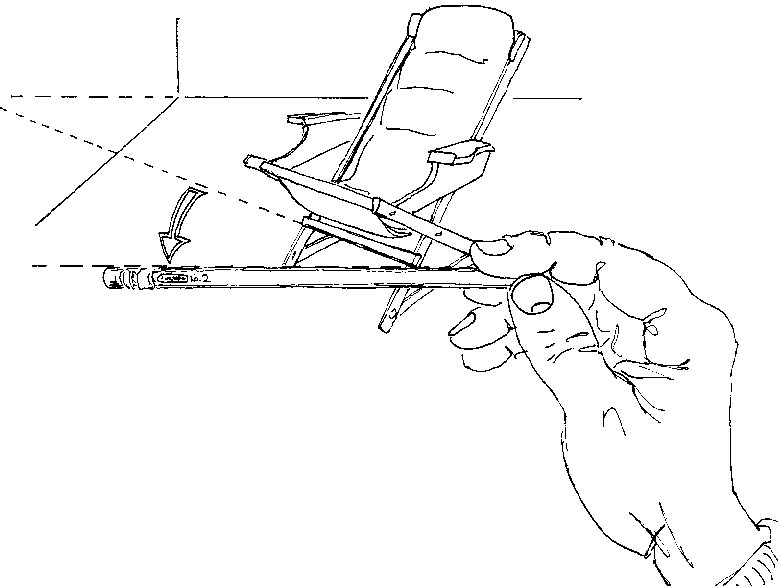
"Sight"
the angle between your object or the beach chair and
horizontal (the horizon line of the wall or the
horizontal
pencil) in this illustration
Step 7
Now, with that angle, that relation in mind, draw it on the paper. This time use the top and bottom of the paper to serve as the horizontal gauges.
(Note: it's good to get in the practice of keeping your arm fully extended.Why? Because with your arm straight out, your hand is always the same distance away from your eye and so it appears on your retina as the same size. It becomes a standard of comparison that won't change.)
There, you've done it!
You've done your first official sighting. You now know what sighting is: you've experienced it. Not to worry, you'll get lots more practice using it. In fact, go right to the...
....Easy Homework. While it's fresh in your memory, read over these next 2 drills:
While you're talking to people today pay attention to how they're moving their heads. They might lean it to the left, or tilt it just a tad to the right. Pretend you can see a vertical line running from between their feet, through the center of the their heads, right up into the sky. It stays vertical even if they move their heads. Try to judge the angle between that vertical line you've imagined and the angle they've tilted their heads.
Also, pretend there's a line that passes left to right between their pupils (from left pupil to right pupil). While a person's head is straight up and and down, this line remains horizontal. As they tip, and tilt their heads, observe the changing angles this line makes in relation to true horizontal. (I.e. the flat of the ground. )
Page through a magazine or find a photograph of some buildings. (Or see/print this illustration - about 39kb ) Consider the edges of the photograph as the horizontal and vertical references. (We called it the "Format" in lesson 6) Just like you did in the first comparison exercise above, observe the lines and angles and compare them, gauge them, relate them to the vertical and horizontal edges of the photograph.
Next, draw those angles and lines using the edges of the paper as the same horizontal and vertical gauge as the edges of the photo.
Go to Exercise 2 in Sighting
Kasbohm & Company's
YouCanDraw.com
© Copyright, All rights reserved 1997
e-mail: jeffkaz@YouCanDraw