
The Supply Store
Back to YouCanDraw .Com

Lesson 9: Light and Shadow |
Look at all you've done!
Lets take a second and look at all the ground you've covered. Over the course of the first eight lessons, you've learned how to deal with three of the five major skills of drawing: perceiving edges, the perception of shapes, and lastly, the perception of relationships.
You learned how to approach edges by recognizing lines and contours in the first five lessons (vase/face drawing, contour, modified contour, and upside-down drawing - lesson 1, lesson 2 , lesson 3 , lesson 4 , lesson 5); You progressed rapidly by making the dimensional leap perceiving negative shapes and positive forms in lessons six and seven ( lesson 6, lesson 7 ); Thirdly, you made the quantum leap in lesson 8 wrestling with relationships: the perspective/proportion encounter. You deserve a giant applause if you've gone through all the lessons so far. Give yourself a great big hand.
Quick links to sections on this page:
|
Now it's time to combine all these with the fourth skill: the perception of light and shadow. And you know what? Compared to proportion and perspective, this will be a relative breeze. And not only that, learning to perceive and then reproduce shadows and shades brings depth to your pictures - it instills your drawings with three dimensions. It's the difference between the flatness of this two-dimensional circle:
 2-D circle |
...and this fully three dimensional sphere: |
 3-D sphere |
You can add depth to your drawings - and I think this is very satisfying. Why? Because your drawing no longer sits there on the paper, it now pulls you in to it, into an illusion with the sense that it's really there in full form.
Shadowing awed me when I first saw a skilled artist/caricaturist use it - taking his finger and in a few quick sweeps and rubs turned a flat line-drawing into a 3-d face. "I got to learn this" I thought. When I asked him how he did it, he said "it's simple - it all makes sense if you think about it". The "it all makes sense" part stuck with me - though it took me awhile to figure it out. But shadowing does make sense, perfect sense. In fact there's a real logic to shadow and light.
Light falls on an object logically
The quick anatomy of light logic's four main parts:
- The Highlight. The Highlight is the brightest light on the page or object. This is the area where light falls at it's most direct on the object.
- The Crest Shadow. This is the shadow that falls on the curved portion of a rounded object. It covers the zone between the highlight and the reflected light. Rarely is it one shade of shadow like it looks here. It's usually darkest at the point farthest from both highlight and reflected light. It's also the key in conveying three dimensionality in an object.
- Reflected Light. Look for this tricky and somewhat sneaky light on any surface. (It's actually light reflected from the environment and other surrounding objects.)
- Cast Shadow. The object stands between the light and it's foundation (i.e. what the object rests on.) The cast shadow is usually the darkest shadow.
It's so logical
Light and shadow make perfect sense. It's a little bit of good ol' linear (left brain) reckoning if you think about it. I'll demonstrate. You're in left field, (yes, you're playing baseball). The pitcher winds up, he delivers, "whack", the batter hits the ball, it's a line drive - straight at you! The ball bounces once about 30 feet away, but you're crouched and ready, arms and glove extended.

Whap!
You're aware the ball is coming straight at your face at 85 miles per hour - you don't have time to get scared then "whap!". The ball's safely in your glove, and all you see in that instant is the shock of that leather web stopping the ball deep in the pocket. A little dust flies.
Stop!
Stop right there. Light is tossed from a light source at an object the same way the batter hit the ball at you at 100 miles per hour. The ball hit's the glove the same way light hits an object - and where it hits, you've got illumination. Where it doesn't, like behind it, it's shadow time. And further, in this baseball example, your face is in the " shadow" of your mitt and goes without a scratch. (Of course if the ball misses your mitt, and hits you in the eye, you end up with a "shiner". Funny how that fits what we're talking about.)
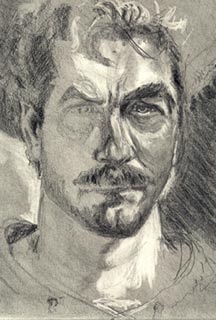
Apply this to the first drawing example
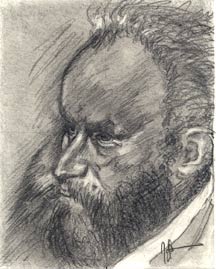
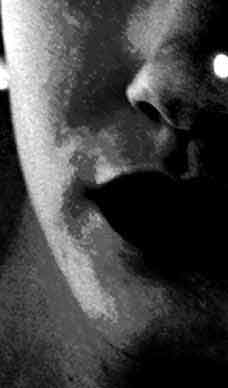
Look at the first example - the partially finished angry cowboy lookin' dude below. It's obvious there's a strong light source coming from the front right. Look at where it hits. The light strikes, for example, the side of the neck (the right side of the picture, or the figure's left side). You can see the light striking the the brow and the side of the nose as well. Keeping in mind the light source is coming from the right, squint your eyes and both the highlights and shadowing will make sense - logical sense. Notice how the side of the nose away from the direct light source is shadowed? Shadows form where light is blocked. Highlights form where light scores a direct hit. Makes sense, right?
| Example
1. Squint your eyes. (back down to link) Notice how the areas of light and dark suggest the proximity and source of light. Notice how shapes of light and dark - not lines - suggest roundness, curvature and depth of the subject to your eyes. Look at the subtle shadowing around the Adam's Apple (it curves up to the bottom of the chin). This suggest roundness. Try squinting again, and you'll see the shape much more readily. |
|
Think of this: how much shadow are you consciously aware of when you're going about your daily activities? Probably not a whole lot. Still you judge depth and shape and physical boundaries all day without consciously thinking about it. (If you weren't doing this, you'd be running into everything.) It's the contrast of light and shadow that contribute a great deal to your perception of depth. (Proportion being the main contributor when you're perceiving something at a distance.) You're constantly employing this judgment. And guess what? It's another R-mode function. You're "thinking mind" - L-Mode - isn't involved in making those depth decisions at all. R-mode however slips L-mode the information so L-mode can both make decisions about how to react and allow you to talk about what you're perceiving.
There's a few more details to light than just that, but that's the general idea. And our job here is to take your recognition of light and shadows from the unconscious level into your conscious, artistic mind.
How "R-mode" is light and shadow perception? If you've ever driven in a blizzard, heavy
fog, felt your way through perfect blackness, or
skied in a white-out you were running deep in
R-mode. (Notice how difficult or non-existent
language became in those situations?) Blind
people have amazing spatial orientation. In
better lit conditions, combining what R-mode
senses with what you feel in your body
(kinesthetically), recreates the sense of depth
inside your brain and your body. Pretty far out
if you ask me. |
 |
Example 2.
Degas copy: Highlights run from
the brightest white (actually manila) of the
paper to near black - which is just the piling on
of layer after layer of pencil lead (look deep in
the beard section). Shades or values of tone range from everything in between made by simple cross-hatching, rubbing, and even erasing into the paper. (back down to link) |
Two words on technique: 1) cross-hatching
How were those different shades of gray produced in the two illustrations? Both were done in pencil. Look close. You'll see different gradations of cross-hatching, you'll see areas where the pencil is just layered over and over to achieve a near black. You'll also see areas where I erased into an area previously shaded over. In fact in some of those areas I erased until I started gouging into the paper - to get the lightest highlights.
2) The "ground"
What may not be obvious in the two drawings above is "the ground". Actually the true background. Adding a "ground" is an old artist's technique. It works like this: before you draw one line on your fresh drawing paper you lightly shade the whole paper to a consistent value - again, before you begin drawing. What does this let you to do? It helps you appreciate and modify light and shadow.
"How" you ask? After you draw an outline of all your shapes and features, parts will need to be colored darker (like shadows), and parts will need to be made lighter - like in the highlights. To create highlights, all you do is erase into the ground and the natural brightness of the paper comes through. To make a part darker, you add layers of color, or pencil, or cross-hatch the are alike I mentioned above. The ground serves as an intermediate shade. More on making your own ground and cross-hatching below.
Getting past a carry-over from childhood drawing habits When people begin drawing as children, shading or dark marks were generally kept off the face - or at least limited to the edges. When you begin your drawing on an already darkened page, you're forced to deal with an already shadowed face. To make the logical parts lighter, to highlight them, you erase into the "ground". Erasing into the ground to make highlights was for me a fascinating discovery. It's like having three colors to work with: first the darkened, shaded paper color, then the color of the pencil, and thirdly, the light of pure paper. The different values of shadow were made by piling up the pencil layers. Not to worry, there's more on using a "ground" coming up shortly. |
Tones and values
Recognizing an area as shadow is a first big, (but relatively easy), step. Seeing the shadow and highlight as a constellation of one or more tones that forms a shape shape is a further extension of the same skill. To master that further step you'll also need to learn to differentiate between values - between the different shades of a tone. Values of tone. Making it a conscious skill to recognize the gradations of tone (or value) is the goal in this section. I through a lot at you there. Let me unpack this for you.................................... (back to top)
Here's how I understand tones and values. Tone suggests color to me, individual colors. Values suggest a range of shades within that color. When we're dealing with shadow in it's purest from, we're dealing with the range of values between black and white. In the same way music is made of high notes and low notes, a "light" or pale shade of shadow has a "high" value; a dark shade is "low" in value. (Like music, "high" and "low" have nothing to do with good or bad.) Here's a value scale of grays from dark to light - or low value to high value:

From black to white and nine shades in between
The scale runs the range from black to white (the white of the background) in 10 steps. Ever seen those fax machines that have "256 shades of gray"? What that's referring to is the number of shades of gray between black and white. (That would be like adding 25 gradations of gray between each of the above boxes of gray. The human eye can distinguish several thousand shades of gray and millions upon millions of color shades.)
Now look at the "Degas Copy" picture just above. Look closely at the darkest parts of the picture - the deepest shadows in the beard and eyes for instance. Now compare these dark shades to the different levels of shading in the forehead or the area of highlight just to the side of the nose above the upper lip. Jump back and forth between them and it'll become plain in a moment - consciously plain - that there's a difference in value. (You can do the same with the cowboy picture a ways up.)
Mini-review: drawing skills build on each other
Before we go any farther, I want you to be conscious of how the different skills you've been learning are building on each other. Keep this in mind as you go on from here: If your goal is to eventually do full color airbrushed caricature masterpieces you'd have to understand painting and color. In order to do that, you have to understand values and "light logic". To maximize your expertise in light logic you have to have a feel for proportionate relations. To understand proportion you need a foundation in shape recognition (as in negative spaces and positive shapes). To best decipher shapes, you need an eye for recognizing and following lines and edges.
Reverse the whole thing: recognition/perception of lines and edges leads to shape perception, which leads to accurate perspective and proportion, which supports light logic, which makes value recognition a conscious skill which directly informs your ability to differentiate color, and, (big breath), leads to the ability to paint a big ol' full color Leroy Neiman masterpiece. Ain't no thing, right? So lets get back in that frame of mind - rediscovering your very own, developing artist's brain.
Getting your right brain, (R-mode), back in the picture
The side of the brain that's immersed in language - the verbal left brain - still resists and tries to altogether ignore incoming non-verbal data like shadows and highlights out there in the world. This was explained and demonstrated in lessons 1 through 6. This stubborn part of the brain has a hard time acknowledging the contribution R-mode makes in recognizing patterns and shapes. In order to make literally survival decisions out there in the environment, L-mode (the left brain) needs this kind of information. It must get this information from somewhere. R-mode is forced to make it's contribution very subtly. Like a humble servant who doesn't want to upset the king, R-mode can't upset the dominance of L-mode without coming under fire or being rejected. It's got to feed L-mode with influential, decision-aiding information on a subconscious level.
Conscious control or R-mode
L-mode is still "us": our conscious ego-driven mind. To draw like/as an artist, our task is to get R-mode operating independently. We need R-mode back under conscious control. How do we do this? Just as before: present L-mode with a task it either rejects or ignores and allow R-mode to subtly exert it's wonderful talents. Pattern recognition, shape recognition, tracing and sighting - these were some of the skills we explored directly and indirectly in earlier lessons designed to pull you into R-mode. Shadow recognition is a direct extension of these skills. We're going to jump right in.
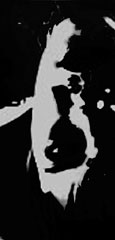
Here's a fun task for you. Look at this shape within a shape:
|
Stare
at the irregular black shape in the middle of the
central gray zone. When it starts to look like
Bart Simpson sitting cross-legged you've found
it. When you can put a name to it, (e.g. the
Bart-like dude), that's an example of
pattern-recognition. And when you "got it", didn't it make you feel gigglish just for a second? That's R-mode taking over. R-mode is strongly suggested in the "voila!", "eureka" experience of insight, and the "Oh, I get it now!" flash when you "get" the punch line of a joke. |
Get some paper for a super quick five minute exercise
We're going to run with this small "meditating Bart Simpson" shape for a little here. I'm going to have you draw it - right side up then upside-down. Don't worry, I know this snuck up on you but it'll only take 5 minutes. So grab a paper and pen or pencil and go for it. This'll be very simple and will drive the as yet unannounced point home.
Your first mini-exercise - grab a paper and a pencil
So go ahead now and draw the "meditating Bart" shape that's in the picture above. Five minutes will be more than enough time. Go on, just scroll up a couple inches. You can do it! When you're done with this quickie sketch go right to the yellow box just below. (back to top)

Take five minutes and do the little drawing.
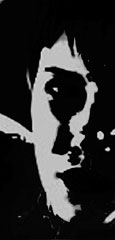
| I've clipped, flipped, and mirrored the "Meditating Bart" shape picture above in the small illustration to the right. I want you to stare at this shape until you see the black shape as it's very own, stand-alone shape sitting there all by itself. Not to worry, just keep staring at it. Gently it will appear as a separate shape. As I stare at it I start seeing a little cartoon figure with a mini Mohawk hairdo, an underbite, no chin at all, and a light gray eye. See it? |
Bart 2 |
The pleasant mini-gestalt of pattern recognition.
Keep looking. You'll see it. You'll get that gentle gestalt feeling when you do. What's a "gestalt"? It's when the way you look at something changes while the thing you're looking at hasn't really changed at all. Your perception has changed and that change can be radical.
- Next, I want you to see if you can recognize the shape as the same Bart Simpson-like character you saw above - but now he's upside down.
- Then again, get some paper, any paper, and draw this funny little shape, ( Bart 2). Like the right-side up Bart you just drew, give this drawing just five short minutes too. Work your way around the edge little by little. Look at the shape between the format and "Bart 2" to help you see the the edges.
- Lastly fill it in black or any dark solid color. (back to top)
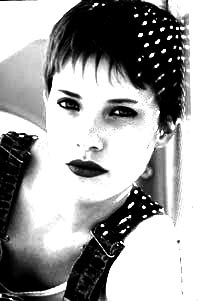
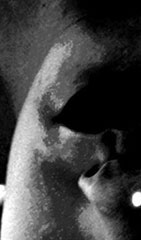
After you've drawn this little shape, I want you to find this funny shape in the picture on the left in the next yellow box below. (Have you drawn it? No? Go, draw it right now. Yes you have? Sorry for the scolding, you should be congratulated. Congratulations.) Do you recognize the upside-down "Bart"? The Mohawk-haired kid? Look again. Maybe now you'll see it as neither Bart nor the cartoon kid with the Mohawk hairdo but as the shadow shape describing a young woman's eye and cheek:
 |
Here's the fascinating part. Look at your rendering (or at the picture to the left). Do you see the shape as the shadow around the model's eye and cheek? When you look at the picture to the right, you now see it as the eye and cheek - as this particular woman's eye and cheek. If somebody sees your rendering or sees the small shape to the right it will always suggest her eye and cheek. (Thus nameable.) |
|
This is an example of pattern recognition - something your right brain is a natural at. Try seeing the shape as all three: first as upside-down Bart, then the Mohawk kid, then for what it really is: the young woman. Doesn't this remind you a little of the "Vase-Face" picture in lesson 1? and a little of the Negative Space / Positive Object" exercises? in lesson 6, and lesson 7? It's the same exercise essentially. Even though we're looking at a specific shape, you're extending a general skill - the general skill of perceiving shapes, except now you're seeing shadow as shape. Play with jumping between the shapes as any of the three interpretations. Do you feel the change at each switch? It's kind of entertaining actually. (To me anyway - I hope for you too.) That's your R-mode muscle getting stronger.
Part of the bigger picture
And here's a further neat fact about this particular shape and this exercise: the shape of this shadow is unique to the shape of this particular woman's face. I know, that's obvious. But let me try saying this a little differently. If you were our subject and we clipped a picture of the exact same section of your face in the exact same same light and applied the same PhotoShop effect, we'd get the same tones but an altogether different shadow shape - a shape that would express the unique topography of your face and yours only. And you would recognize it, and your friends would recognize it, and anybody who has the pleasure of seeing you in person and seeing the cropped photo of you would recognize it as you too. That's the pattern recognition part. One level of it. Before you saw the Bart-like shape above as the unique shadow of a woman's face it was just a peculiar shape. Now, after seeing it as part of larger picture, you can interpret the shape as anyone of the interpretations we tried.
Still, the biggest shift, the subtle mini-explosion of a shift, comes when you recognize the woman without benefit of seeing the rest of her face. In fact, it's as if you see the rest of her face subconsciously. Look at the next picture, (it's the same one with a tad more information). Do three things: 1) perceive the woman's face and 2) switch between seeing the "Bart" character and the "Mohawk" kid. 3) Be conscious of the subtle shift of perception - of how it felt in the instant of changing between interpretations of the shadow shape. Play with jumping between the shapes as any of the three interpretations for a few more seconds. Strive to feel the change at each switch. Starting to feel it now? a little? That's your R-mode muscle getting still stronger.

Unique shadow
| People who've had strokes or brain trauma to the right hemisphere can't make the connection between the pattern and the bigger picture. To these unfortunate people this little shape we've been playing with is just a chaos of form, representative of nothing. That's one way we have of knowing how the hemispheres of the brain interact. |
So what's the pattern in this particular woman's picture?
This shadow shape we're spending so much time on exists within a larger context: the entire face of the young woman, which has neighboring shapes, background shapes, and a rectangular format. Before you saw it couched in the shapes and shadows of the whole picture, it was a pretty random shape. Now that you've seen it as part of a bigger picture, it "makes sense" sitting there all by itself.
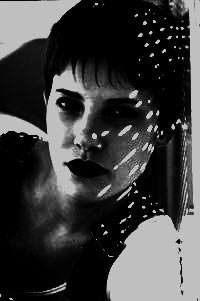
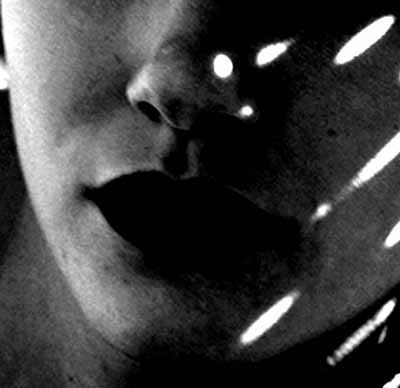
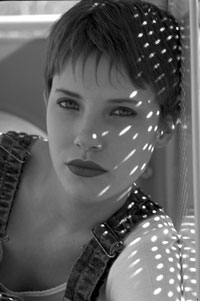 Example 3 |
Notice
how the changing shapes of the elliptical light
spots give you the sense of roundness and
curvature in the model's face? Look for instance at the spot of light on her nose - the almost circular one . Now look at the two light shapes on her cheek directly to the right of the nose. They're elongated ellipses. Here's the point: without knowing the shape of her face your brain infers - that is it knows - the shape of her face. |
Building value and shape
recognition:
your job as an artist
And that's your job as artist, or caricaturist, or portrait painter: recognize and accurately record all those those shapes, edges and contours. We're going to tweak this shape-perceiving ability by exercising value perception. The next additional steps build directly on this and are the key to value recognition. And a key trick to getting your foot inside the value-distinction room is employing the simple squint.................................. (back to top)
Squinting
With so many different shades of gray in shadows, how do you pick and choose? How do you simplify the shadows down to their most basic shapes? You know what? The answer is very simple: Squint! Yes good old fashion, gotta-get-new-glasses squinting is the very simple answer. This is a simple technique you'll want to incorporate into your drawing skill repertoire as soon as possible. So lets get to work on it.
Levels of squinting
We're going to experiment with your own built in shutter system. Learning to use your eyes like a camera shutter will help you instantly shrink and expand the spectrum of shadow shapes and tone values literally right before your eyes. (back to top)
Here's how you do this. Read through the quick directions before you do this - you'll get stuck at the "close your eyes" step if you don't. (I just figured that out :-).)
- Line up the screen on your monitor so you can read these steps and see the pictures just below at the same time. (If you can't see both simultaneously, scroll down to the pictures so you can make sense of the directions.)
- While looking at photo B below, close your eyes all the way. Now, while facing the screen, open your eyes just a smidgen. Open them to just the point where you can see two tones: the light gray of the background / incoming light, and the black of the shadows. Focus on the area of the model's face that's shown in Photo A.
- With just the minimal amount of light coming through your slit eyes you'll blot out out the majority of detail. Open and close your lids until the gray shade of Photo B looks almost as black as the same shadow areas in Photo A. You may have to move closer to or farther from the screen to get the same effect.
Photo A |
Photo B |
Do you kind of get it? Keep looking. The purpose here is to get you seeing big blocks of shadow - the variety of grays can be a little overwhelming at first. Squinting helps you whittle those "tone shapes", (areas of similar color or value), down to manageable areas of similar value. In time and with practice you'll be able to distinguish as many layers of color and shade as you like. But one step at a time. We'll step up the stakes in the next "visual" exercise. (back to top)
| Another use of contour: you've heard of elevation contour used in contour mapping, right? Or "isobars" dividing barometric pressures and "thermobars" showing different temperatures zones on the news or on those USA today weather maps? The idea is the same here: except here you outline the different shades of gray. Those outlines become shapes. And that's our goal here: to momentarily reduce all that detail into definable shapes. |
Increasing the value
Using a large photo, we're going to blow up one small part of our model's face. By looking at this you can see a large array of shades - that is values - of gray. Following the same steps you just went through, experiment with varying your squint. You want a squint where a tad more light passes through your eye lids so that you see similar shades of gray in the two photos below - not just black or monotone you aimed for above. Said a little differently, squint so the gray you see in the picture on the right almost exactly matches the values of gray you see in the picture on the left. Look back and forth between the pictures until you can closely match the gray.
Then, look between the outlined areas on the right and try to match them with the same area on the left. Keep trying until you see the same shape on the left - until you see the same outline and contour. You'll see why the outlined shapes on the right were outlined the way they were. You may have to adjust your squint as you move from section to section:
 |
 |
Play with squinting until the the grays match
In order to do the contour map of the woman, (the one with the yellow outline), I looked at the the same image in PhotoShop and squinted until the major areas of shadow looked like unique individual shapes. I outlined each separate contour and shape with the PhotoShop pencil tool squinting the whole time. But you don't need PhotoShop to do this. What you need is this skill so you can do the same with a pencil, a pen, in a sophisticated computer program, in the snow at 10,000 feet, or in the sand at a Pacific ocean beach! (Which, just for fun, is getting pummeled by 15 foot waves, high winds and 2 inches of rain under deep purple clouds on this February, 2000 Winter day. I love it when it rains in Southern California.) (back to top)
More Practice
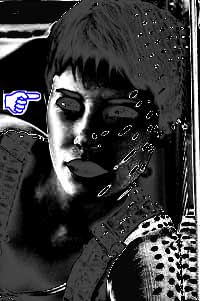
If you're feeling ambitious, look over these different contrast pictures of the same photograph. I want you to try to visualize different areas of value as unique shapes. I'll even further push you to try and scribble out a few of these areas on some drawing paper. Don't' get hung up on doing the whole picture - just focus in on an area and try to draw particular shapes. Use the same steps you used above. I'll give you little hints below on what shapes to zero in on each picture.
 |
 |
 |
|
In photo 1, draw the shape of the lightest gray: the shoulder that's up against the window in the lower right corner. Observe closely the shapes of the elliptical light shapes coming through the screen and landing on her hair, face and shoulder. Observe the shapes of light at each area of transition: from hair to cheek, and cheek to shoulder.
In photo 2, zoom into the shape of the eyes, nose, lips and mouth. Observe how much roundness you attribute to the face, forehead and chin with only almost no shade information. Now squint and look for the unique shape that's formed by the shadow between her eye and nose - no lines there, just a subtle shadow.
In photo 3, observe the shape of the highlight running down the entire right side of her face, (on the side with the pointer finger). Also notice that when you squint, this picture changes from a near negative to resembling photo 1.
Photo 4 is the untouched original. Squint and see if you can't see the basis of the more extreme shadow shapes of the other pictures. Single out small sections and see if you can't identify what's similar and what's not in each area. Ask yourself "what is it about each of these photos that allows me to recognize them as the same person?".
Two last exercises
Lastly, using the "upside-down effect" to get R-mode more involved, tape tracing paper to your computer screen and, while squinting if necessary, outline the major shadow shapes of these two pictures. (Flipping the two upside down will make them that much more unrecognizable - which pulls your artist mind back into the picture.)
And as a very last task, trace the large picture below, (the "last picture"), in it's right side up orientation. You can go after this with as many shades of gray as you like. If you feel frustrated, that's OK! keep working through it. Part of that is L-mode wanting to control the assignment again. If the picture looks too complicated, squint so tight all you see is one or two values of gray. We'll be coming at this from other angles below: lots more practice coming.
|
|
The last picture:
Take a break and
congratulate yourself
for a fantastic effort!
Kasbohm & Company's YouCanDraw.com © Copyright, All rights reserved 1997 e-mail: jeffkaz@YouCanDraw |